
What if you could keep in touch with people forever, whether or not they’re clients, marketing leads, long lost friends or family, and even if you don’t normally find it easy to stay in touch with people?
In this guide, you’ll learn how to create your own automated follow-up system so you’ll never fail to keep in touch with the people you need to keep in touch with.
Why Create Your Own Automated Follow-Up System
Relationships matter! But for people to feel close to you, whether personally or professionally, you need to actually, you know, talk sometimes.
The problem is that it takes work to keep in touch with people. You have to look up their phone number or email address. You have to think of something to say. You have to remember to do all of this in the first place!
It may sound like I’m being flippant, but I’m not trying to be. The truth is that sometimes staying close to people, while important, is just enough of a tedious process that we can avoid it.
Which is the perfect time for an automation!
You could use this automated follow-up system to:
- Keep in touch with friends and family so they know you care about them
- Check in with coaching clients every week
- Follow-up with potential customers monthly
- Send a birthday text to your friends automatically
- Drive your sales process and close more clients
- Follow-up with your most loyal customers to show your thankfulness
What else could you use this follow-up system for? Let us know in the comments!
Note that this isn’t about creating a pre-written marketing email campaign or sales email sequences or drip campaigns or even nurture emails. This is about taking the best of manual follow-ups, notably their human touch, and adding a level of automation to make that process seamless, so you don’t forget.
Personally, I’m the worst at keeping in touch. I’m streaky with relationships, either getting in touch a little too often or forgetting that someone even exists for months. It’s not that I don’t care about people. I DO! It’s just that I get preoccupied with all the things I need to be doing until normal, every day relationships feel like a distraction.
It’s a problem.
But that’s what the automaton army is here for: to solve problems!
How This Automated Follow-Up System Works
This automation takes a list of contacts and schedules regular follow-ups to them based on a schedule that you set. It’s easiest to use to follow-up over email, but you can also configure it for text with a little extra work.
What You Need to Build This Automaton
To create this automation, you’ll need a couple of tools:
- Airtable for your list of contacts (but Google Sheets can work too). You can think of Airtable as a fancy spreadsheet tool, and it’s a great foundation to make low or no-code applications. It has a few features in particular that will make the more advanced features of our automaton possible.
- Zapier to create your follow up email (can use Make.com as well, but we’ll demo this with Zapier). Zapier is the connector platform, taking data from one app and using it in another and another and another, with various amounts of logic in between. It’s all configuration and no (or low) coding, so anyone can use it. It’s a huge driver in our automaton army.
- Gmail or another email service
- (Optional if you want text follow-ups) An SMS service like Twilio
Ready to get building? Let’s go!
How to Build Your Own Follow-Up System: The Steps
To build this automation, you need to start by creating a list of contacts that you want to keep in touch with. Then you need to create the zap(s) that manage the follow-ups. Finally, you can fine-tune the automation by creating some automations within the Airtable itself, including notifications to remind you to check your results. Here are the steps:
Step 1: Create Your Follow-Up Airtable of People You Want to Keep in Touch With
The first step is to create a new Airtable, either from scratch or using our handy-dandy follow-up template.
We’ll need two tables in this automaton, one to keep track of our contacts and one to track our messages.
Table 1: Contacts
Here are the fields you’ll want to use in your Airtable, plus the field type. (P.S. This can be a Google sheet as well!)
Required Fields
- Contact (formula field). The full name of the contact person. We’ll use a formula, {First Name} & ” ” & {Last Name}, to combine the first and last names.
- Frequency (single select). How often your automation will attempt to get in touch with the contact (e.g., Monthly). This helps in scheduling follow-ups.
- Last Contacted (linked record). Records the date when the contact was last contacted which we’ll use to determine when the next follow-up should occur.
- First Name (single line text field). Stores the first name, useful for personalizing communications.
- Last Name (single line text field). Holds the last name, important for formal communications and record-keeping.
- Email (email field). The contact details, namely their email address, essential for sending emails or newsletters.
- Contact Type (single select field). Categorizes the contact (e.g., Family, Friend, Colleague, Client, Lead, etc), so we can tailor the communication style and content.
- Emails Log (linked other records). A log of emails sent, useful for tracking communication history. We’ll populate this later, so leave it blank for now.
Optional Fields
- Phone (phone field). The contact’s phone number, especially if you want to automate SMS.
- Birthday (date field). For an optional birthday automation.
- Communication Preference (single select). What’s the best way to keep in touch with your contact? You could use this to reach out in the right medium.
- Tone (single select). Later, we’ll use ChatGPT to help us rephrase our follow-up emails, and we’ll use this field to tell chat what tone to use. Here are some tone options you might include: Informal, Professional, Grateful, Motivational, Thoughtful, Encouraging.
- Message fields (long text field). One or more fields can be used to help you make sure your emails have a personal touch. You might have:
- Latest Thing You Did Together. A note on the most recent activity or interaction with the contact, which can be a conversation starter for the next communication.
- Anything Upcoming In Their Lives. Important upcoming events or milestones in the contact’s life, useful for showing attentiveness and care in communication.
- What They Said Last. Key points or topics from the last conversation, valuable for maintaining continuity in communication.
- Generate an Email (button link). We’ll set this up later to generate an email on demand.
- # of Emails. The count of emails sent to the contact, helping to keep track of the relationship.
Table 2: Follow-up Messages
We’ll also create a second table to keep track of the messages we send. Here are the required fields for this table:
- Message Name (formula field). We’ll use this to label the entry as a whole. For the formula, it’ll be, {Contact} & ” – ” & {Date Generated}.
- Contact (linked record). This will display the contact getting the message (and also populate the email log field in the Contacts table).
- Date Generated (date field). Super important field because we’ll use it to power the Follow-Up timer later!
- Message type (single select). Options include Email, SMS, Phone call, etc.
- Subject (single line text). To set the subject lines of your emails, if applicable.
- Message Body (long text). This is where we’ll have the main body of the message.
- Status (single select). Keep track of whether you’ve sent the email or not. Options: Not Sent, Drafted, Sent.
- Message # (number field). Allows us to keep track of how many emails we’ve sent.
- Email (lookup field). From the contacts table.
Once you create the tables (or copy it from our template here), fill it in with a couple of contacts so we can start to see how it works! Then, on to step 2 with our automation.
Step 2: Create the Follow-Up Automation: Basic Version
Next up: it’s time to create the automated follow-up so we can actually do the work of keeping in touch with our contacts.
You can create this follow-up automation yourself or find our follow-up automation template here.
Caveat To This Method
Now, there’s actually two ways to automate the follow-up: an easy but limited way and a less-easy but much more scalable way.
I started out by creating the easy way until I realized that it would break with too many contacts (more on that in a second), but as long as you just have a couple, you’ll be fine. And even if you want to go with the more advanced method, it’s easy enough to create this version and upgrade it later.
How This Automation Will Work
The way this version works is that we’ll have Zapier check the table every Monday for contacts that we need to follow-up with.
Then it will use the information about each contact that we’ve logged to generate a draft of an email for each contact using ChatGPT (thus making sure each email is at least a little bit unique).
Finally, it will send a reminder notification with a link to find the email drafts and send them.
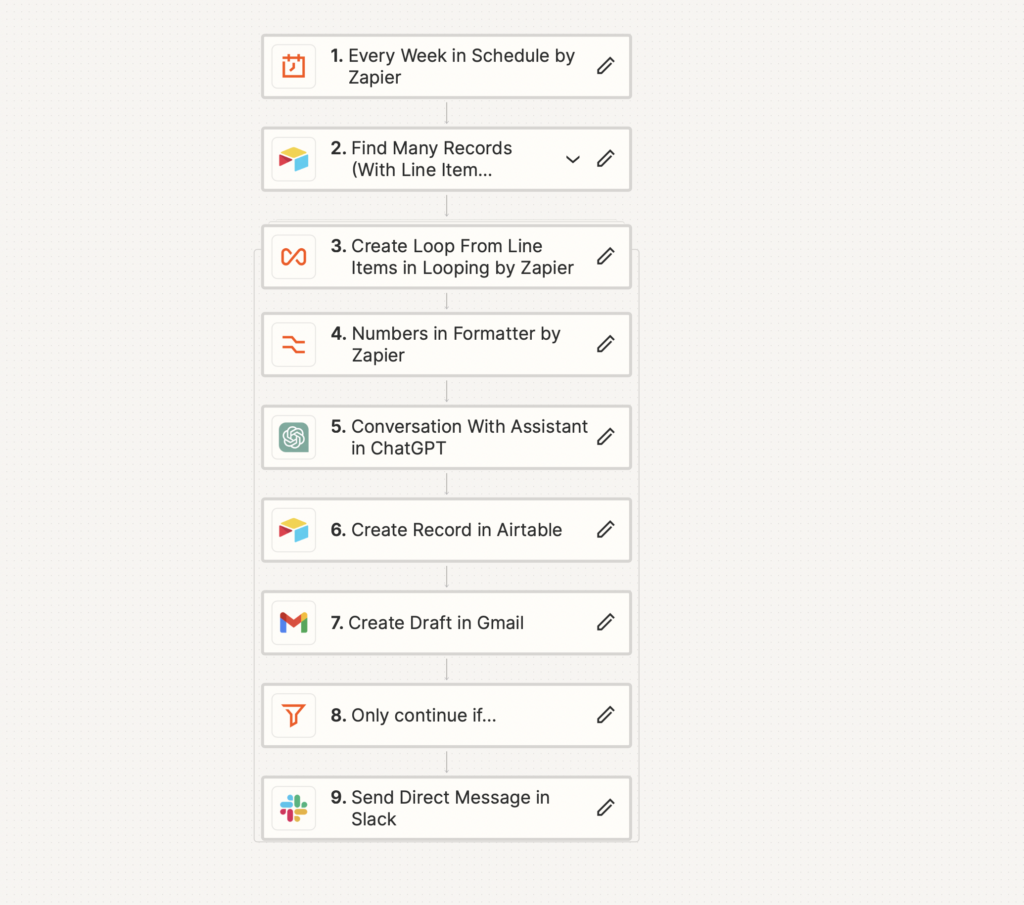
Here’s how each of the steps work:
- Schedule by Zapier (Weekly). This the trigger step. It starts the Zap on a weekly schedule. You set the day and time when the Zap should run. I chose Monday at 9 am.
- Find Many Records (With Line Item Support) In Airtable. This action connects to the Airtable base and finds multiple records that meet certain criteria, such as all contacts due for a follow-up. There’s a major limitation to this action though, which is that it can currently only find 10 items at a time. Thus, if you need more than 10, this method won’t work (we’ll talk about how to fix this in the next step). Still, for just a few contacts, it’s fine. Connect this to your Airtable base we create in step 1, and let’s get started.
- Create Loop From Line Items in Looping by Zapier. This is a really handy action that processes each record found in the previous step individually, allowing for actions to be taken on each record in subsequent steps. You can only work with 100 line items (or contacts), but that’s more than enough for us.
- Numbers in Formatter by Zapier. The formatter action handles any math, and in this case we need to add 1 to the “Email #” field so we can accurately track how many emails we send to each contact.
- Conversation With Assistant in ChatGPT. We’re using this ChatGPT step to take all the info we logged about our contact and generate a personalized message to them. By using this along with some instructions on tone, we can make sure to always generate a unique message and, ironically, avoid coming off as a robot. Of course, you’ll still want to edit the draft you created to make sure it sounds like you later.
- Create Record in Airtable. We want to keep track of each message we generate, so this action creates a new record in the Airtable base under the follow-ups table. This also updates the “Last Follow-Up” field in the Contacts table, which is super important!
- Create Draft in Gmail. This takes what ChatGPT said and pops it into a Gmail draft so it’ll be ready to send.
- Only continue if … [Loop Iteration is Last] = [true]. We use this filter step so that we can do something only if it’s the last iteration of the loop. We don’t want to do the next step 10 times!
- Send Direct Message in Slack. Finally, it’s nice to know that the emails are generated so we can go find them! The final action sends a direct message in Slack with a link to our Gmail drafts folder so we can easily find the messages our automaton just made. By the way, you don’t need to use Slack here. You might send a text or an email. But I usually use this when I’m at work and it’s nice to get a reminder on Slack.
Alright, there you go. That’s our basic automation (make sure to check out the template here).
But as we said, we have a problem if we want to send more than 10 follow-ups at a time.
Fortunately, there’s a pretty great fix IF you’re willing to do a little more legwork. Let’s see how it works.
How to Upgrade the Follow-Up Automation
The automation method above works if you have a small number of contacts, but what if you want to follow up with more than 10 people?
To do this, we need to move away from using our “Find Many Records (With Line Item Support) In Airtable” action and instead lean on one of Airtable’s coolest features: custom views!
Step 3: Create a Custom Follow-Up Timer View
Sometimes you want to reorganize your data in a different way. Maybe you want to hide certain columns so you can keep the focus on only what you need for the current task. Maybe you want to even share your table with a friend, but you don’t want to share everything.
That’s where custom views come in. You can take your same data and just show it off in a slightly different way.
Where this becomes especially handy is when you’re working with automations, because one of the best ways to trigger an automation is when a record enters a specific view.
For our purposes, we want to create a follow-up timer that will only display the contacts we’re supposed to be following up with on that specific day. Check it out here in our template.
Here’s how we’re going to do it:
- Start by creating a new view in the Contacts table called “Follow-Up Timer.”
- Then, on the filters, we’re going to get a little technical (you can check out the filters in the screenshot below OR in the template). As you can see, we have 4 condition groups, all of which are focused on the field “Last Contact.” This is the field that tracks when we last followed-up with our contact. They also check the Frequency field, so we know have a date to compare it to (you’ll need one set of conditions for each frequency, e.g. Weekly, Monthly, Daily). Here’s how the logic works: You’ll show all contacts where:
- The Last Contact date is empty, so we can make sure to follow up with any new contacts.
- The contact Frequency is Weekly, but it’s been 7 days or more since we were in contact.
- The contact Frequency is Monthly, but it’s been 30 days or more since we were in contact.
- And finally, the contact Frequency is Daily, but it’s been a day or more since we were in contact.
- You can add more if you want to create custom Frequencies.
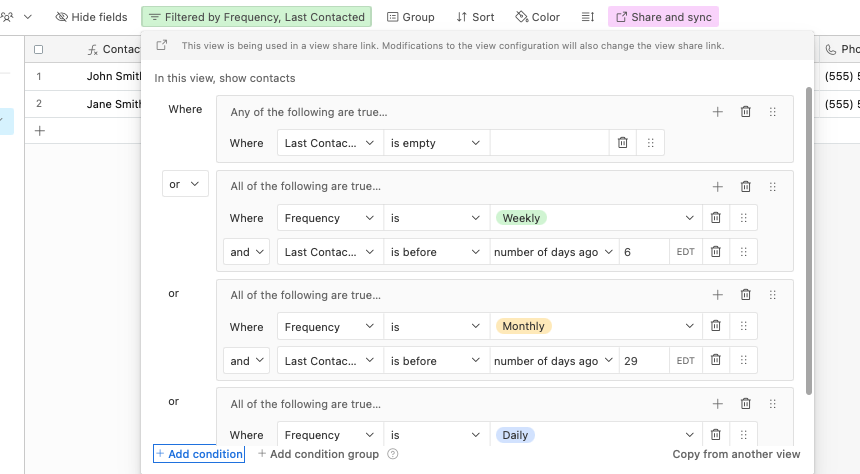
Once you set up the filter, you should see any contacts who need to be followed-up with! Then, once you’ve followed-up, it will update the “Last Contact” date, filtering out that contact until the next time they’re in the follow-up window. Cool, right?!
While we’re here, we need to add two new fields to our Contacts table:
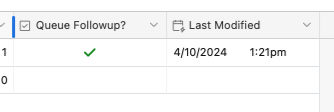
- Queue Follow-up? (checkbox field). We’ll be using this field to trigger our Zap in Step 5.
- Last Modified (last modified time). Zapier requires this field type to create a trigger, and we’ll be using it in Step 5.
Next, we’re going to need to add another quick automation right in Airtable. Onward!
Step 4: Queue Up Your Email
Airtable has it’s own set of automations, some of which are especially useful and that you can’t find in Zapier, namely triggering when a record enters a View.
This is going to allow us to
You might be wondering: if Airtable has it’s own automations, why do we need Zapier at all. Good question!
Airtable has quite a few integrations with other apps, including Gmail, Twilio, and Facebook Pages.
Unfortunately, it doesn’t have some of the integrations we need, like creating a draft in Gmail (they only can send an email) and with ChatGPT (although they do have their own in-house AI tool, that costs extra). Thus, for now at least, we need to use Zapier to use all the tools we need.
How the Airtable Automation Works:
- When a record enters a view. Our trigger will run when a contact enters the Follow-Up Timer view we created in the last step.
- Update record. Then, we’ll update the contact by checking the “Queue Follow-Up” checkbox we created in the last step.
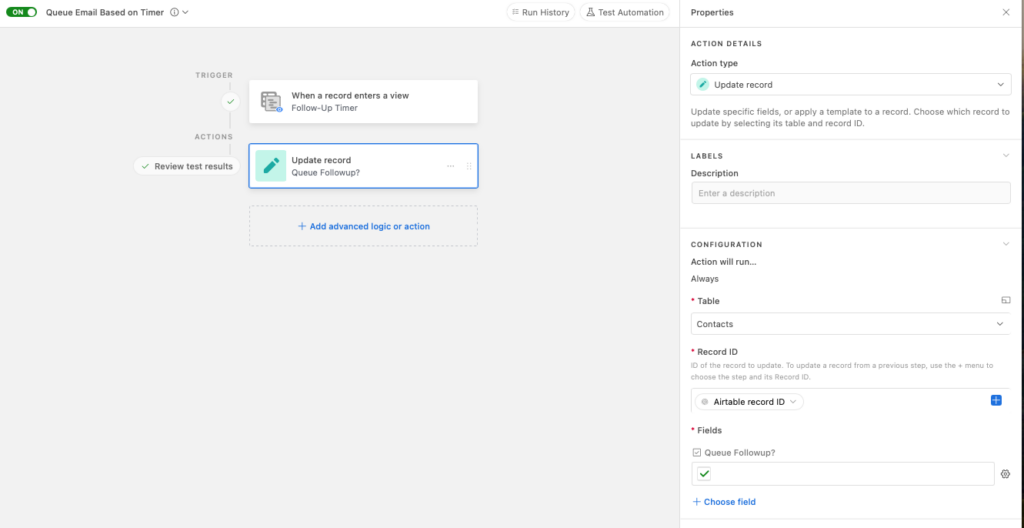
This will then be the trigger our Zap uses to generate the email!
And just like that, we’ll have a scalable system that easily let’s us generate an unlimited number of follow-ups!
Step 5: Update Your Follow-Up Zap Automation
Now that we have our timer, let’s take a second look at our automation (by the way, in cases like this I always duplicate the zap so we don’t lose the old version in case something goes wrong).
Follow the steps to create it below or use our handy follow-up automation template here.
- New or Updated Record in Airtable. This is the trigger step that starts the Zap. It activates when a contact’s “Queue Follow-Up” checkbox field is updated.
- Only continue if Checkbox is TRUE. We need this filter step to avoid infinite loops. The Zap will only continue if the checkbox is marked as true, so when we turn it off at the end of this Zap, it won’t generate the email again.
- +1 to Email Count. As before, we need to do a little math (old email count +1) so we can get an accurate count for the new email.
- Conversation With Assistant in ChatGPT. As before, we’re using ChatGPT to take all the info we logged about our contact and generate a personalized message to them.
- Create Record in Airtable. Again, we want to keep track of each message we generate, so this action creates a new record in the Airtable base under the follow-ups table.
- Create Draft in Gmail. Same as before, we’ll generate our email draft in Gmail so it’ll be ready to send.
- Unqueue checkbox. This action resets the checkbox field in our Airtable base, making the record ready for the next cycle of follow-ups.
- Send notification that the email has been generated. The final step sends a notification that the email has been created.
How does it look? Pretty cool right?!
And just like that, you’ve create your automation.
Now Go Create Your Own Automated Follow-Up System
We all need a little help staying close to the people who matter to us. This automation helps you do that, and most importantly, not forget to do it!
Of course, this is just the start, though. You can also create versions of this for phone calls, SMS messages, and other reminders simply by adding new versions of the Zap.
But I hope this gives you a good framework to customize your follow-up system to suit your needs.
Good luck! Here’s to your freedom!
Share your results! How will you use this automated follow-up system to keep in touch with people? Do you have any suggestions for improvement? Let us know in the comments!